When considering purchasing upgraded parts for your vehicle one of the first decisions to make is whether you plan to do the installation yourself or pay a dealership, shop, or mechanic. Both have benefits and downsides to keep in mind.
The option to have the work done for you can be tempting initially and can be a good route for the person that doesn’t have the spare time, doesn’t plan to race or take their vehicle to the track, and has the finances to afford a quality level of workmanship. Many garages, shops, dealerships will offer warranties, hire qualified staff, and have the proper tools/hardware to do the job correctly. They will have the expertise to help in purchasing the correct parts to correlate to your purchase. The issue can lie in trying to find the lowest cost option.
It may seem to be a great deal to have a neighborhood “mechanic” or the lowest price shop do the work for you, but if/when issues arise it’ll be the vehicles owner that has to pay to fix the mistakes of the first job. It is common for major corporations to hire staff at minimum wage with no qualifications which can lead to lazy work and improper tool use. It’s not difficult to find stories of shops making mistakes such as over tightening lug nuts, forgetting valve stems in tires, etc. Both of these examples can lead to much more expensive repairs shortly after receiving your vehicle.
For example: having your tires blow out on the freeway and causing an accident (forgotten valve stems in tires) or having a wheel detach from the vehicle and thrown into oncoming traffic (under or over torqued lug nuts). Both of these examples happened to me after taking my car to a major corporate auto facilities, I was lucky to walk away without causing injury/death to myself or others. Not to mention the cost/time of repairs afterward.
In doing the work yourself you will gain the piece of mind that the job has been done properly as well as learning about your vehicle for future upgrades or in the case a repair is needed. With multiple online resources as well as your owners manual to reference it is simply a matter of learning about your vehicle’s specifications and techniques to do the job properly.
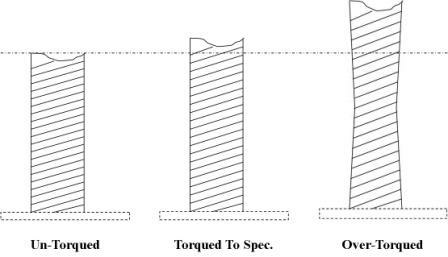
One of the most common mistakes a lower paid employee will make is using an impact wrench to torque your lugs. While this may take less time and seem easier, every vehicle has a specific torque setting for lug nuts to prolong the life of the hubs and lugs. This will also avoid damaging the threading of the lugs and hubs to keep the vehicle easy to maintain while avoiding “swollen lug nuts” or stripped threads. While it’s ideal to use to torque wrench to get the specification perfect, it’s still safer to tighten the lugs by hand as opposed to a power tool.
Some information to help understand the terminology when reading your owners manual or online references.
Additional Wheel / Bolt Pattern Measurement Information
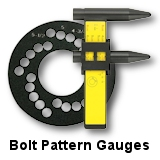 Key Identifying Wheel Dimensions: Wheel Bolt or Lug Pattern (or bolt circle, lug circle, lug pattern, etc.) is the measured diameter of an imaginary circle formed by the centers of the wheel lugs or bolt holes. Bolt patterns can be 3, 4, 5, 6, 7, 8 or 10 lug holes. A bolt circle of 5 x 4.5 would indicate a 5 lug bolt pattern on a circle with a diameter of 4.5 inches.
Wheel Dimensions
There are four important measurements that are used to categorize and identify a wheel for fitment purposes.
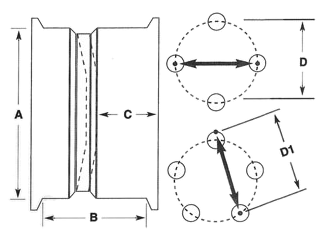
- Rim Diameter The actual diameter of the wheel at the point where the tire bead seats (NOT the outer lip of the rim).
- Rim Width Measure from the inside of the outer lip at the bead seating point to the inner lip.
- Back Spacing From the inside of the wheel at the point where it contacts the hub, brake drum or axle flange to the inside edge (lip) of the wheel.
- Bolt Pattern The measured diameter of an imaginary circle formed by the centers of the wheel lugs or bolt holes.
How To Measure Wheel Bolt Pattern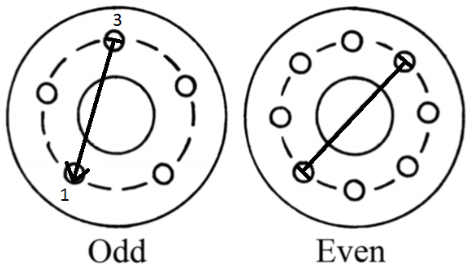
If there is an EVEN number of lugs: Measure center-to-center on lugs directly across from each other.
If there is an ODD number of lugs: Measure from the CENTER of one lug to the OUTER EDGE of the hole diagonally across from it.
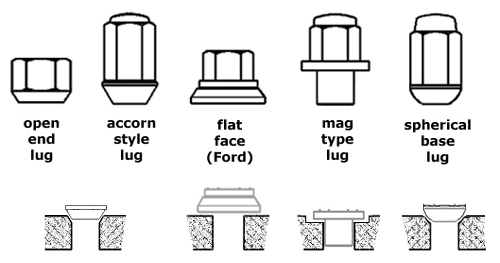
Lug Nut Types
Bolt Pattern Torque Sequence / Specifications:
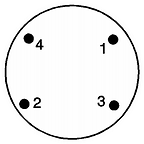
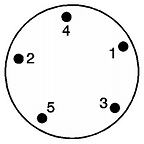

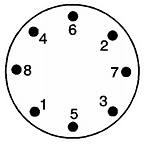
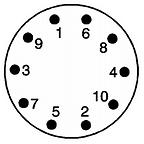
| Stud Size | Typical Torque Range in Ft/Lbs | Minimum Thread Engagement (turns) |
| 12 x 1.5 mm | 70 – 80 | 6.5 |
| 12 x 1.25 mm | 70 – 80 | 8 |
| 14 x 1.5 mm | 85 – 90 | 7.5 |
| 14 x 1.25 mm | 85 – 90 | 9 |
| 7/16 in. | 70 – 80 | 8 |
| 1/2 in. | 75 – 85 | 8 |
| 9/16 in. | 135 – 145 | 8 |
Alloy wheels should always be installed using a torque wrench ensuring proper mount. Check your vehicle owner manual for specifications. Learn More: How To Properly Torque Lug Nuts / Lug Bolts
Hub Center Bore
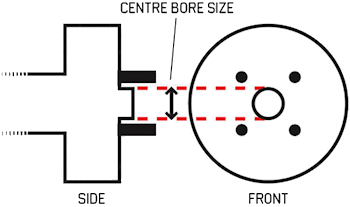 Hub Center Bore: Relates to the center hole in the wheel that centers the wheel on the hub of the car. Since most wheels are mass produced, they have a large center bore to accommodate several different vehicles. If this is the case, it is recommended that you use a hub ring. Hub rings are hard plastic or metal ring that fits between the wheel and the vehicle. This centers the wheel perfectly on the hub ensuring that there is no run out when the wheel is installed on to the vehicle. Without hub rings it is possible to get vibrations even if the wheel / tire assembly is perfectly balanced.
Wheel Offset
Wheel offset is the distance from the mounting surface of the wheel to the true center line of the rim. A positive offset means the mounting surface of the wheel is positioned in front of the true center line of the rim / tire assembly. This in effect brings the tire in to the fender well more. Conversely, a negative offset means the mounting surface of the wheel is behind the true center line of the rim / tire assembly. This will cause the tire to stick out away from the vehicle.
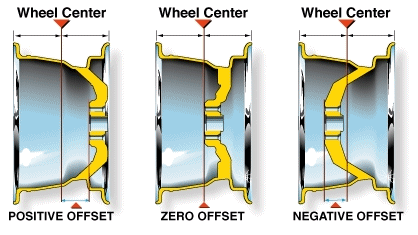
H = High – Positive Offset, typically FWD (Front Wheel Drive) +45, 40, 35 offsets
M = Medium – Neutral Offset, typically RWD (Rear Wheel Drive) +20 offset
L = Low – Zero to Negative Offset, Offset typically RWD (Rear Wheel Drive) 0 offset
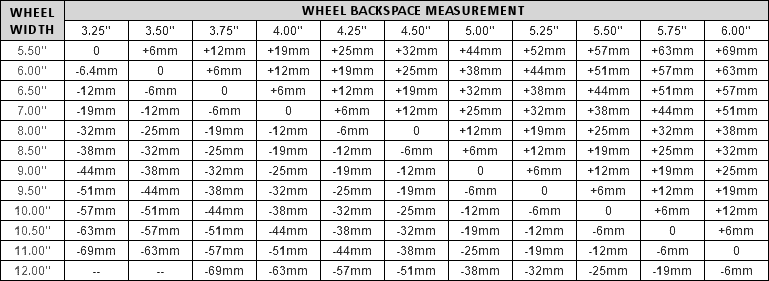
Common Bolt Pattern Conversions
THREAD SIZE
This is a measurement of the diameter of the inner opening of a lug nut. You can get the lug nut’s thread size by measuring the diameter of the stud it matches. Since these measurements tend to be of small circular surfaces and need to be precise, dial or digital calipers are the best tools for the job. Your vehicle may use SAE or metric:
• Common SAE sizes are 7/16, 1/2, 9/16 and 5/8.
• Common metric sizes are 10mm, 12mm and 14mm.
THREAD PITCH
This is the distance between the individual threads and can be measured by counting the number of peaks in a certain distance. For SAE lug nuts, that distance is 1 inch. For metric, it is 1 millimeter. Once again, these manual measurements can be most easily taken from the matching stud. This can be a pretty small area, so if you have to take the measurement manually, it might be easier to mark off 10 mm instead and then divide the total peaks counted by 10 afterward to get the 1 mm measurement.
The easiest way to find both thread size and pitch is in your owner’s manual. You also can take another matching lug nut or stud to a hardware/automotive store and match it up by threading it on.
SEAT TYPE
The seat is where the nut meets the wheel. Different angles are available by manufacturer and application.
• A shank or mag seat has no taper and contacts the wheel as a flat surface, often with a washer. When replacing these, pay attention to the length of the shank.
• Tapered seats have 45- or 60-degree angles, with 45 being used for racing applications and 60 for off the track.
• An E/T Ultra tapered mag seat combines both a taper and a shank.
• A ball seat is rounded.
This information is accurate to the best of our knowledge. No warranties or guarantees are expressed or implied as to the accuracy of the information provided on this site. Use of this site constitutes your agreement to these terms.

